Author Archives: The Sicilian Penthouse

Unknown's avatar

About The Sicilian Penthouse

I am a first generation Italian-American, who grew up in the Bushwick section of Brooklyn on Stanhope and Knickerbocker Avenue during the 50's and 60's. Growing up, we spoke English ("American") and our Sicilian Dialect from the town of Santa Ninfa. On our block we had many Sicilians who came from the same town as well as others who came from Castelvetrano, Santa Magherita, Cattabelotta, Mazzara, Castellamare del Golfo, etc... The "Americans" were mostly Irish Americans, and very little Spanish. We loved being American! and learning about being American. We loved going to school, PS86K on Irving Avenue, and making more American friends. It was a GREAT Era! We played on our block all day long and when we were done playing and hanging out on the stoop with our friends, we would go upstairs and have dinner with our parents. First we had a pasta dish, then we had a meat dish with a vegetable like asparagus or string beans or maybe cardones. We also would have some kind of a salad. Salads like tomato salad, or potato and green bean salad, or sometimes a regular lettuce and tomato salad. There were lots of vegetables in all our foods, like pasta piselli, pasta e fave, pasta "cu" broccolo, pasta e broccolo bianco. Stuffed peppers, stuffed artichokes, stuffed mushrooms, broccoli rabe, on and on.... I'm here to bring back these wonderful memories and the foods we ate. Hope you enjoy, "e mangia mangia!!!!" P.S. Olive Oil and Red Wine Vinegar IS Italian Dressing! Margaret Romolo Zukor

“Lu Baccala”

Standard

I love “lu baccala” when it is done just simple and eaten right away.

1 – Buy your baccala, “na spina” or more.  Soak the baccala in water for at least 3 days changing the water at least every day.  This will get rid of most of the salt the codfish is brined and dried in.After soaking the baccala it will be more manageable to cut it and prepare.

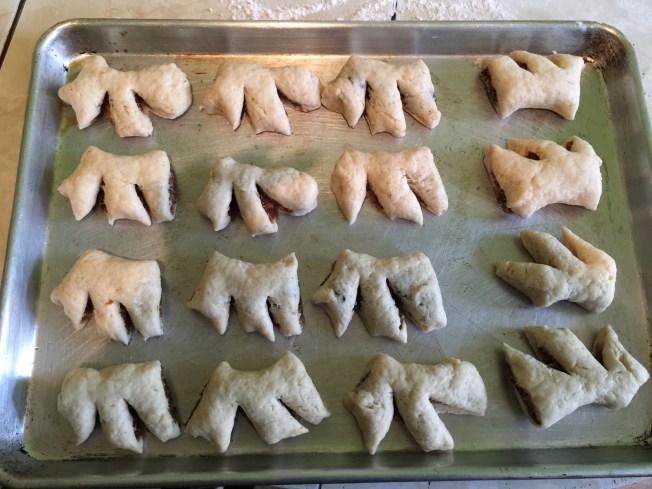
2 – After drying with paper towels, cut “la spina”  into pieces such as you see in the pictures.

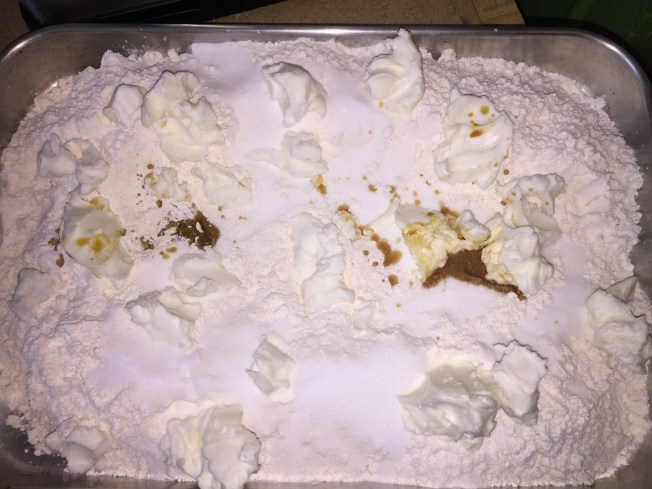
3 – Dredge each piece one at a time in a bowl of plain flour.  That is what you see in the first picture.

4 – Fry the pieces of baccala in a deep pan of heated oil, whether it is olive oil, canola oil, vegetable oil, or a combination of these.  When the pieces are a golden brown take them out and you can place them on a paper towel to absorb the frying oil.  Don’t crowd the pan.

5 – After draining the oil you are ready to “dress” the baccala.  Put the pieces of baccala in a large bowl where you will add chopped parsley, and sliced garlic.  You can layer the pieces in as you add the parsley, garlic on top of each layer. When you are ready to eat the baccala serve with lemon slices. Squeeze lemon juice when you are about to eat so the baccala doesn’t get soggy.

Eat fresh out of the frying pan, or cold, or reheated in the toaster.  They are always good and delicious!

Just some Sicilian women making the fresh tomato sauce in the backyard!

Standard
image

“Ha usare u trubelli vecchio e fino, per fare squalare i pomidore”. You have to use an old and thin tablecloth so you drain the tomatoes. These tomatoes have been par-boiled so the skins break. Now they are draining after coming out of the boiling water. Next, they will be picked up all together in the tablecoth and dumped into the sauce machine.

imageimage

image

Three sisters and a sister-in-law all work together on making “la sarsa”. This backyard tomato sauce making season is usually around the end of August until the end of September. That’s Sicilian for Sauce. In high Italian, it’s called “salsa di pomodoro”.

“I Cosi Dolce” also known as Cuccidati – that’s Fig Cookies!

Standard
IMG_1468

These are one version of these delicious Sicilian Christmas Cookies.  They have a thicker cookie part filled with a fig mixture.

IMG_1442

This is 4 pounds of Flour, add to it 4 cups of Crisco, 2 tablespoons of Vanilla, 2 cups of Sugar, 2 tablespoons of Baking Powder. As you can see they are using an oven pan to put all the ingredients in and combine, until they are ready to take it onto the table top.

Add 5 beaten eggs to this mountain of ingredients, and combine it all together.

  Mix it until all the flour is combined.  Add a little scalded milk if the dough mixture is too dry.

Roll the cookie dough into logs.  Slice the dough about an inch thick.  Flatten it out and put some fig mixture in the middle as you see above.  Then close it up.

IMG_1459

After rolling up the dough with the fig mixture, you slice it to reveal the filling.  Place them on an oven pan.

This is the fig mixture filling for these cookies.  It consists of mashed up figs, dates, orange zest, honey, clove powder.

For the glaze you will mix a cup of confectioners sugar with water and a squeeze of lemon.  Add the water a little at a time until you get a thin consistency that will allow you to brush it onto the cookie, or simply smear it on with you hands as you see us doing!

Beating a mixture of confectioners sugar with water and a squeeze of lemon.  Only add enough water to make a thin mixture to be brushed on to the top of each cookie after the have cooled.  Drop sprinkles on the cookies while the sugar glaze is still wet.


La Frittata (Potatoes, Onions, and Eggs)

Standard
FullSizeRender(10)

Potatoes and onions are frying in the pan.  Add salt and pepper.

FullSizeRender(11)

The potatoes and onions have fried up nice and brown.

FullSizeRender(9)

The beaten eggs have been added to the pan of potatoes and onions.  I stirred them up for chunky pieces.  However, I usually do not stir it up, I pour in the eggs and when I think bottom is cooked enough I flip it, then my frittata is in one piece.  I’ll be back with that one.

You will need a large skillet.  Today I am mixing up the eggs when I cook them into the pan with the sauteed onions and potatoes, so I will not be sliding it out to flip it in the pan for the other side to cook, I’ll do that another time.

1 large onion, yellow or Vidalia

2 large potatoes, peeled, rinsed and cut in half and half again and then sliced up to make them into large to medium rectangular cubed pieces

6 eggs, medium or large, scrambled in a bowl, ready to pour when the inions and potatoes are ready

Salt and Pepper added to your taste

Heat up the oil, I used olive oil.

Add the onions and the potatoes, cook them till they are nicely browned and you can tell that the potatoes are cooked.

Add the scrambled eggs to the skillet and let this cook until you can see the eggs are getting done.

Then stir up the eggs in the potatoes/onions to cook up the rest of the eggs in the pan.

Don’t let the eggs get brown, over cooked

Stir the pan to get all the eggs cooked

All of this should be done over medium heat, but that depends on the size of your burner, so use you judgement.  Usually, I use the low setting on the front burners because they are the large ones. If you use the medium sized burners then you can go to the medium heat setting.

Serve it up in a dish and I like a little ketchup on the side.


Fresh Backyard Tomato Sauce with Farm Fresh Sausage

Standard
Fresh Backyard Tomato Sauce with Farm Fresh Sausage

This Sunday, I made the Fresh “Backyard” Tomato Sauce I got from my friend.  This year’s tomato crop wasn’t all that great according to some, but the backyard sauce I got from my friend Lauren was tangy, and I really like it that way.  Usually, I deglaze with red wine vinegar, but I don’t if the sauce is tangy already.  I knew this sauce could stand up to some extra flavorful ingredients and so I started with my “mire poire”.  Today I am also adding the farm fresh sausages to the sauce which I get from the Amish in Pennsylvania.

In a big pot (4 quarts or more) begin:

Cover the bottom of the pot with olive oil, how much? until the bottom is covered, then stop!

1 medium or large onion, sliced and sauteed in the oil over medium heat, always heat the oil before adding onions.

4 or 5 or 6 or even more cloves of crushed, sliced or minced garlic, added to the sauteed onions.

1 or 2 stalks of celery, cleaned sliced, diced, and practically minced. 2 or 3 small/medium carrots, also sliced, diced,  and practically minced.  Add celery and carrot to the browned onions and garlic.  We want everything to get nice and soft.  Stir it up at regular intervals.

1 package of Baby Bella mushrooms, rinsed and washed out in water, and sliced.  Add them to the pot and cook down the mushrooms stirring everything up, cooked well.

3 jars off “Backyard” Tomato Sauce added to the pot, mix it up to combine well.

Top the sauce with a bay leaf, some oregano and some fresh basil to your liking.

Add salt and pepper to your taste.

Simmer low and for at least an hour.

image

Sauteed onions, garlic, celery, and carrots in olive oil.

image

Cooking down the sliced mushrooms in the onion, garlic, celery and carrot mixture. I always get the Baby Bella (Crimini) mushrooms when they are available.

image

image

I add 1 bay leaf, lots of fresh basil and oregano to the sauce. Simmer, low heat stirring regularly.

image

This is my farm fresh sausage, cut up because the farm does not make links, just an average 1lb big sausage link you cut up yourself. I baked the sausage whole in the toaster oven at 350 for 30 minutes turning it once, and then I cut it up as you see before adding them to the sauce.

image

Sauce with all the ingredients mixed in.

image

Rigatoni with home made “backyard” sauce and fresh sausages from the farm. The basil was from my herb garden, the oregano from Italy, bay leaf is from my Aunt’s Laural Bay tree in Sicily. Yes I smuggled the bay leaves in.

Fresh Homemade Tomato Sauce

Standard
Fresh Homemade Tomato Sauce

If you ever come across some great plum tomatoes, I suggest you buy about 5 pounds and make a real homemade sauce good enough for a 1 pound box of pasta.  I have been to tomato festivals and purchased a special kind of grape tomato called the Juliet tomato which you can use as well.  Any farm fresh tomatoes will turn out an amazing sauce!   The process can be laborious, but for the rare occasion that you do, it will be an extra special treat for you and your family.  The tomatoes on the left are beautiful heirloom tomatoes from a farm that I could not resist buying, they were delicious as a sauce.  The yellow, green, orange tomatoes make a less acidic sauce and just as good.

Wash your plum tomatoes as you like.  Carve out the green stem base at the top and make an X cut on the bottom.  This and the par-boiling will help it to separate the skins form the tomato for the making of the sauce.

Wash your plum tomatoes as you like. Carve out the green stem base at the top and make an X cut on the bottom. This and the par-boiling will help it to separate the skins from the tomato for the making of the sauce.

Scoop out the tomatoes from the boiling water into a colander to drain before you begin the milling process.  Secure the food mill over a bowl with a proper fit, the mill should sit right into the bowl opening which is about the same size.  Place about 5 tomatoes in the food mill and begin milling by turning the handle.  The juices from this process will go right into the bowl.  That is your fresh homemade tomato sauce!

Scoop out the tomatoes from the boiling water into a colander to drain before you begin the milling process. Secure the food mill over a bowl with a proper fit, the mill should sit right into the bowl opening which is about the same size. Place about 5 tomatoes in the food mill and begin milling by turning the handle. Add more tomatoes as you see fit.  The juices from this process will go right into the bowl. That is your fresh homemade tomato sauce!

Fully milled tomatoes, now only seeds and skins for you to scrape out.

Fully milled tomatoes, now only seeds and skins for you to scrape out.

Lift the mill to check the level of the sauce so it doesn't touch under the mill.

Lift the mill to check the level of the sauce so it doesn’t touch under the mill.

After you mill the first group of tomatoes, you need to scrape up what is left in the food mill and place it into a colander or dish.  This "leftover" is referred to as pomace.  It is used in the food industry as "vegetables", yes check your labels, even in dog food.

After you mill the first group of tomatoes, you need to scrape up what is left in the food mill and place it into a colander or dish. This “leftover” is referred to as pomace.

The bowl with the tomato sauce in it.  The food mill with "leftover parts" of the milled tomatoes. The wooden spatula used to scrape up and clean the mill.  I saved the left over, called pomace into the plastic container you see under the spatula.

The bowl with the tomato sauce in it. The food mill with “leftover parts” of the milled tomatoes. The wooden spatula used to scrape up and clean the mill. I saved the left over, called pomace into the plastic container you see under the spatula.

The tomato puree collected in the bowl.

The tomato puree collected in the bowl.  Sautee your onions and garlic and add this tomato sauce for pure heaven.  You can also freeze this sauce for later use but not for more than 3 months.  Use a glass container with a plastic cover when ever possible to save your sauce whether you are freezing it or cooking it soon.  You can also freeze your sauce after you have cooked it.

How to Save Your Basil

Standard

I love fresh basil as many of you reading this probably do also. However, once it is cut from the plant or taken home from the store it starts to turn black – that is my experience. My mother would freeze whole leaves of basil in a storage container, but flavor-wise I wasn’t satisfied with this method. So how do we enjoy our basil in the Winter or when we don’t have a garden to grow it in? My friend Pat takes it off the plant as she needs it, but when the growing season is over, she takes her basil, cleans it and puts it in the blender with some extra virgin olive oil and freezes it. When she needs it, she chops off what she needs.  Now I do the same thing.  We put it in a squeeze bottle also which is very convenient.  Refreezing after using a portion of it doesn’t seem to ruin it either.  I have this blender mixture of fresh basil and olive oil in a squeeze bottle and a regular container in the freezer all year round now, it’s great!  The chopping of the leaves releases more basil flavor.  The squeeze bottle is very convenient for topping off focaccias and capresi salads. So enjoy your “fresh” basil all year round!

IMG_0120IMG_0121IMG_0122IMG_0207

Sarsa di Pomidore Fresca (Salsa di Pomodoro Fresco)

Standard
These are two of Lauren's mother-in-law's jars of home made tomato sauce.  I call it "Backyard Sauce" because it's made in the back yard during peak tomato season, late August and September.

These are two of Lauren’s mother-in-law’s jars of home made tomato sauce. I call it “Backyard Sauce” because it’s made in the back yard during peak tomato season, late August and September.

Fresh Home Made Tomato Sauce aka “Backyard Sauce”

10659138_10152584995152631_668828381534050262_n10410928_10152584994947631_2240413780330908347_n

Late August and September is tomato sauce making season!!!  There are still many Italians who make it in their back yards with the help of their family members.  It is quite an event and I am envious because my mom never made “backyard sauce” as I like to call it.  It requires equipment and bushels of tomatoes.  Of course growing up on Stanhope Street and Knickerbocker Avenue we never had a back yard so I guess we had a good reason.  When we moved to DeKalb Ave, my father was very ill and and so we never had the chance to make the sauce in our new back yard.  As I got older there was always someone giving away these jars of sauce like precious gold and now I very happily receive jars every year from my friends who make it during the sauce making season.

Here I am frying up some onion and garlic to add my jars of sauce to, then I topped it off with a dash of fresh oregano and basil from my yard.  I hope you get to experience this wonderful fresh sauce.  I loved mine, it was tangy and simply delicious.

Fry and onion until golden glossy and a bit brown.  Then add chopped garlic to your liking.

Fry an onion until golden glossy and a bit brown. Then add chopped garlic to your liking.

I added the two jars of home made back yard tomato sauce to the fried onions, garlic, and olive oil.

I added the two jars of home made back yard tomato sauce to the fried onions, garlic, and olive oil. Add salt and pepper to taste.

These jars of sauce were so delicious to me because they were tangy and I like the fresh sauce like that.  That's a basil leaf in the jar, they always jar the tomatoes with a basil leaf.

These jars of sauce were so delicious to me because they were tangy and I like the fresh sauce like that. That’s a basil leaf in the jar, they always jar the tomatoes with a basil leaf.

Here is the beautiful homemade tomato sauce simmering away.  I sprinkled some oregano and added some fresh basil leaves from my yard.

Here is the beautiful homemade tomato sauce simmering away. I sprinkled some oregano and added some fresh basil leaves from my yard.

photo 1

Don’t forget the Pecorino Romano!


Pasta cu Brocolo

Standard

Well today I attempted my mother’s Pasta cu Brocolo, and that means pasta with broccoli or pasta broccoli.

I used one whole head of very fresh garlic.  Sliced and toasted/sauteed in a big pan with enough olive oil to cover the bottom of the entire pan.  When the garlic started looking beigey-brown I added one pound of frozen broccoli florets right out of the bag.  In the meantime, the water was boiling and the spaghetti was cooking in it.  I continued cooking the garlic, broccoli, olive oil in the big sautee pan, and when the broccoli seemed cooked enough I added the drained spaghetti.  I added salt and pepper to the big pan of my pasta cu brocolo.  I let it cook a little more all together for just a couple of minutes.

What did I learn from this experiment?  It tasted almost like my mother’s but not exactly.  I was still delicious but as much as my mother’s.  Next time, I will use two whole heads of sliced garlic and chop the broccoli before adding it to the pan.  I will also reserve some of the pasta water to add a little to the whole dish in the pan.  AND I will make sure I have grated cheese on hand like Percorino Romano or Parmgiano Reggiano.

So I will be back after my next attempt at my mother’s Lina Romolo’s pasta cu Brocolo!  Thank you for visiting, and remember to “eat while you can!!!!”

photo 1

Here you can see that I just did not cut up the broccoli enough,  the dish is better when the broccoli pieces are smaller and mixed throughout more evenly.  My next suggestion is using a linguine or macaroni like gemmeli.  So next time,  2 heads of garlic/one pound of broccoli/one pound of pasta with reserved water.  Capisce?